Installation
Intended workflow
The DQ Workbench has two distinct components with different lifetimes:
Web UI — a configuration tool. Use it to create and edit your
config.yml, then stop it. It does not need to run permanently, and because it has no built-in authentication it should never be left exposed on a public-facing port.CLI (
dq-monitor) — the production workload. Once you have aconfig.yml, schedule this to run daily via cron or a systemd timer. It connects to DHIS2, runs the configured stages, and exits.
A typical setup looks like this:
A data manager runs the Web UI on their laptop to build the
config.yml.The finished
config.ymlis handed to the server/system administrator.The administrator schedules
dq-monitor --config config.ymlto run daily.
—
There are four supported ways to install the DQ Workbench, depending on your environment and how you intend to use it. Choose the one that suits you best:
Windows installer — recommended for non-technical Windows users; no Python or Docker required.
Docker — recommended for the Web UI on Linux/macOS; no Python installation required.
Python virtual environment — recommended for production CLI runs (cron / systemd).
Conda — alternative for local use if you already use conda.
The Python virtual environment and Conda approaches require cloning the repository first:
git clone https://github.com/dhis2/tool-dq-workbench.git
cd tool-dq-workbench
Windows installer
Requirements: Windows 10 or later. No Python, Docker, or command-line knowledge required.
The Windows installer is the recommended option for data managers who are not comfortable with the command line. It bundles the entire application into a standard Windows setup wizard — double-click to install, double-click to run.
Download
Download the latest installer from the GitHub Releases page:
dq-workbench-X.Y.Z-windows-setup.exe
Installation
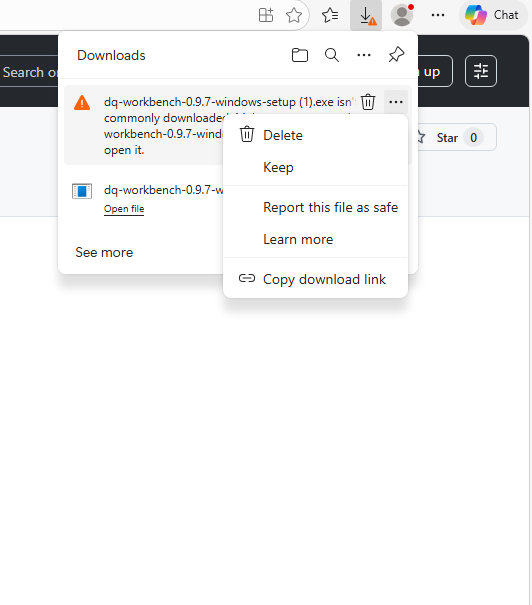
Run the downloaded .exe. Windows SmartScreen may display a warning because
the installer is not code-signed. This is expected. Once the file has
completed downloading, click on the “…” in the upper right corner
of the download notitication and choose “Keep”.
You may be prompted a second time by Microsoft Defender SmartScreen. In the bottom left of the dialog, choose “Keep anyway”
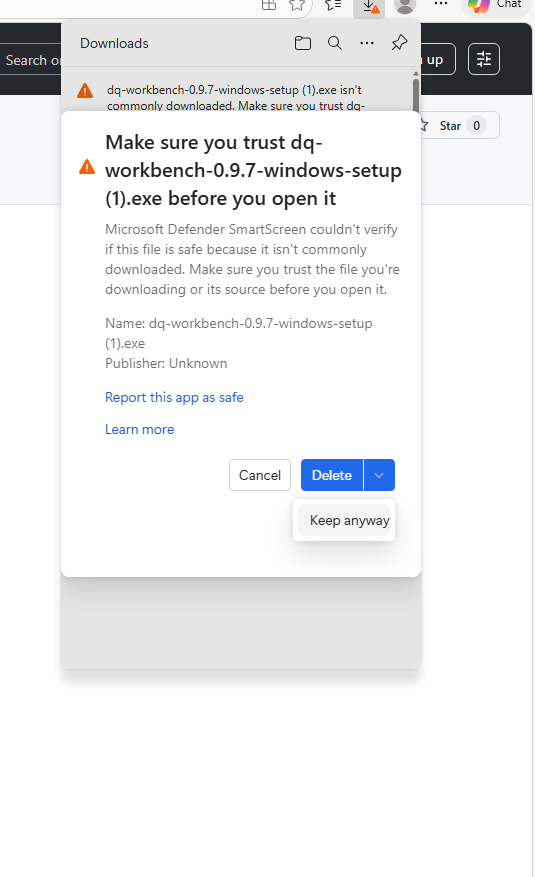
Once you have performed those actions, you should be able to open the installer.
The installer wizard will guide you through the rest:
Choose an install location (default:
C:\Program Files (x86)\DQ Workbench)Optionally create a desktop shortcut
Optionally launch the app immediately after installation
Running the app
Double-click the DQ Workbench shortcut in the Start Menu or on the desktop.
A console window opens and your browser navigates automatically to
http://127.0.0.1:5000.
On first run you will be taken straight to the server configuration page — enter your DHIS2 server URL and API token to get started.
Close the console window to stop the server.
Configuration file location
Your configuration is saved to:
C:\Users\<your-username>\Documents\DQ Workbench\config.yml
This file is in your Documents folder so it is easy to find and share. Once you have finished configuring your stages, hand this file to the system administrator who will schedule the CLI runs on the server.
Updating
Download and run the latest installer from the GitHub Releases page. It will replace the existing installation automatically.
Docker
Requirements: Docker.
The Docker image is the recommended way to run the Web UI. A data manager
can spin it up on their laptop, point it at any DHIS2 instance, build a
config.yml, then shut it down — no Python installation required.
The image is published automatically to the GitHub Container Registry on every
push to main and on tagged releases. The registry is public — no login
required.
Quick start (remote DHIS2)
This is the primary use case. One command is all you need:
docker run --rm -p 127.0.0.1:5001:5000 \
  -e DHIS2_BASE_URL=https://your-dhis2-instance.org \
  -e DHIS2_API_TOKEN=d2p_your_token_here \
  -v $(pwd)/config:/app/config \
  ghcr.io/dhis2/tool-dq-workbench:latest
The web UI will be available at http://localhost:5001.
If no
config.ymlexists in the mounted volume, one is bootstrapped automatically from the environment variables.The
-vvolume mount persists your configuration across container restarts. Omit it if you only need a temporary session.Stop the container with
Ctrl-C.
Warning
The web UI has no built-in authentication and no CSRF protection. It is designed for short-lived local use only — run it on localhost or a trusted network, and stop it once you have finished editing your configuration. Do not expose it on a public-facing port.
Quick start (local DHIS2 also running in Docker)
If your DHIS2 is running locally via Docker, localhost inside the workbench
container refers to itself — not your host machine. Use
host.docker.internal instead:
docker run --rm -p 127.0.0.1:5001:5000 \
  --add-host=host.docker.internal:host-gateway \
  -e DHIS2_BASE_URL=http://host.docker.internal:8080 \
  -e DHIS2_API_TOKEN=d2p_your_token_here \
  -v $(pwd)/config:/app/config \
  ghcr.io/dhis2/tool-dq-workbench:latest
Note
The --add-host flag is required on Linux. On macOS and Windows,
host.docker.internal works out of the box without it.
Quick start (local DHIS2 running directly on Linux, not in Docker)
Use --network host so the container shares the host network stack and can
reach localhost directly:
docker run --rm --network host \
  -e DHIS2_BASE_URL=http://localhost:8080 \
  -e DHIS2_API_TOKEN=d2p_your_token_here \
  -v $(pwd)/config:/app/config \
  ghcr.io/dhis2/tool-dq-workbench:latest
The web UI will be available at http://localhost:5000.
Note
With --network host the container shares the host port space, so the
web UI is on port 5000 (the gunicorn default). Gunicorn logs
Listening at: http://0.0.0.0:5000 — this is the bind address inside
the container. Open http://localhost:5000 in your browser, not
http://0.0.0.0:5000.
Optional: stable Flask session key
By default a random session key is generated at startup, which means browser sessions are invalidated whenever the container restarts. To avoid this, pass a stable key:
export FLASK_SECRET_KEY=$(python3 -c "import secrets; print(secrets.token_hex(32))")

docker run --rm -p 127.0.0.1:5001:5000 \
  -e DHIS2_BASE_URL=https://your-dhis2-instance.org \
  -e DHIS2_API_TOKEN=d2p_your_token_here \
  -e FLASK_SECRET_KEY \
  -v $(pwd)/config:/app/config \
  ghcr.io/dhis2/tool-dq-workbench:latest
Using Docker Compose (advanced)
For a more permanent setup, copy the example environment file and use Docker Compose:
cp .env.example .env
Edit .env and set DHIS2_BASE_URL, DHIS2_API_TOKEN, and
optionally FLASK_SECRET_KEY.
Start the web UI:
docker compose --profile web up
Run the CLI on demand:
docker compose run --rm cli
Schedule the CLI daily via cron (crontab -e):
0 6 * * * cd /path/to/tool-dq-workbench && docker compose run --rm cli >> /var/log/dq-monitor.log 2>&1
Note
For production scheduled runs (cron / systemd), a direct install via Python virtual environment is simpler than Docker — fewer moving parts and no container networking to manage.
Conda
Requirements: conda or mamba. This is the recommended approach for local use — conda manages the Python version and the scientific stack (NumPy, SciPy, pandas) automatically.
Create and activate the environment:
conda env create -f environment.yml
conda activate dq-workbench
Copy and edit the sample configuration file:
cp config/sample_config.yml config/my_config.yml
Run the web UI:
gunicorn "app.web.app:create_app('config/my_config.yml')" --bind 0.0.0.0:5000 --timeout 300
The web UI will be available at
http://localhost:5000.Or run the CLI directly:
dq-monitor --config config/my_config.yml
Python virtual environment
Requirements: Python 3.10 or later.
Run the setup script (creates
.venvand installs the package):./setup.sh source .venv/bin/activate
Or manually:
python3 -m venv .venv
source .venv/bin/activate   # On Windows: .venv\Scripts\activate
pip install -e .
Copy and edit the sample configuration file:
cp config/sample_config.yml config/my_config.yml
Run the web UI:
gunicorn "app.web.app:create_app('config/my_config.yml')" --bind 0.0.0.0:5000 --timeout 300
Note
Do not use
python -m app.web.appin production — it starts Flask’s built-in development server, which is not safe or stable for production use. Pass--debugif you need debug mode during development.
Flask secret key
The web UI uses a secret key to sign session cookies. If FLASK_SECRET_KEY
is not set, a random key is generated at startup — sessions will be lost on
container or process restart. For a stable key:
python3 -c "import secrets; print(secrets.token_hex(32))"
Set this value in your .env file (Docker Compose), as a -e flag
(docker run), or exported in your shell before launching gunicorn.